New York Central bay window caboose 21630 brings up the rear of Flexi-Van hotshot SV-4 at Worcester, MA on 4/30/67. NYC 21630 was from Lot 827, built by St. Louis Car Co. in 1952 and rebuilt and renumbered from series NYC 20298-20497 during 1963-65. Tangent has just completed a second run of this car in HO scale, with a revised shade of Century Green.
SV-4 was the Selkirk-Boston section and carried trailers in addition to Flexi-Van containers. While NYC was widely known for its innovative container system, it began TOFC service in 1962 and joined Trailer Train in 1964 with TOFC spreading across the system. Clearance issues close to the city prevented piggyback service into Boston until 1966. Scanned from the original Tom Murray Kodachrome slide, my collection.
New York Central Alco RS3 #5527 passes through the former Interlocking #26 at the east end of the Worcester Yard on November 5, 1967 (unknown photographer, author’s collection, scan of Agfachrome transparency. Worcester Stamped Metal never had a sidetrack – the Worcester Consolidated Street Railway used to run between the B&A and the building. The real hidden story here revolves around NYC simplifying infrastructure to cut costs.
In the mid-1950s, facing rising costs and declining traffic, NYC announced a plan to single-track much of the system and install Centralized Traffic Control (CTC), this included the Boston & Albany. The railroad postponed that project while traffic projections were reassessed as the traffic decline showed signs of stopping, possibly due to the growth in automotive and intermodal traffic. In the meantime, NYC took other methods to reduce their plant. Here at milepost 43.2, Tower 26 has been demolished and the interlocking reduced from five crossovers to just one plus a spring switch at the entrance to the yard, protected by a single aspect dwarf signal. The spring switch let eastbound freights exit the yard without having to stop and reset the switch once clear. It was one of only two places on the mainline that had them at this time, the other being both ends of the single-track crossing of the NY State Thruway in East Chatham, NY. Westbounds meeting a stop signal at the home signal (seen just past the end of the train) had instructions to call Tower 28 for instructions immediately. Eventually, NYC and Penn Central would reduce the main to a series of CTC islands like this, controlled remotely from just a few towers.
In the mid-1980s Conrail finally single-tracked the B&A. Since then, double track has been going back in and may stretch continuously for 150 miles from Boston to Pittsfield in a few years if the plan to increase passenger service beyond Worcester comes to pass.
NYC 5203 leads a wreck train westbound through North Grafton, MA on October 30, 1966. Scanned from Agfachrome slide, photographer unknown, author’s collection.
I thought this would make a neat project if I ever get enough rolling stock built to start looking for oddball projects to work on. Several pieces of equipment in this train would be off-the-shelf models (bay window caboose, 52′ gon) or easy kit conversions (wheel flats, possibly the coach at the end), while others would be more involved. The crane was X-13, from a group of four 250-ton cranes built by Industrial Brownhoist. Options here would be limited to old Athearn and Bachmann models to use as a base. Some additional research is definitely in order…maybe someday.
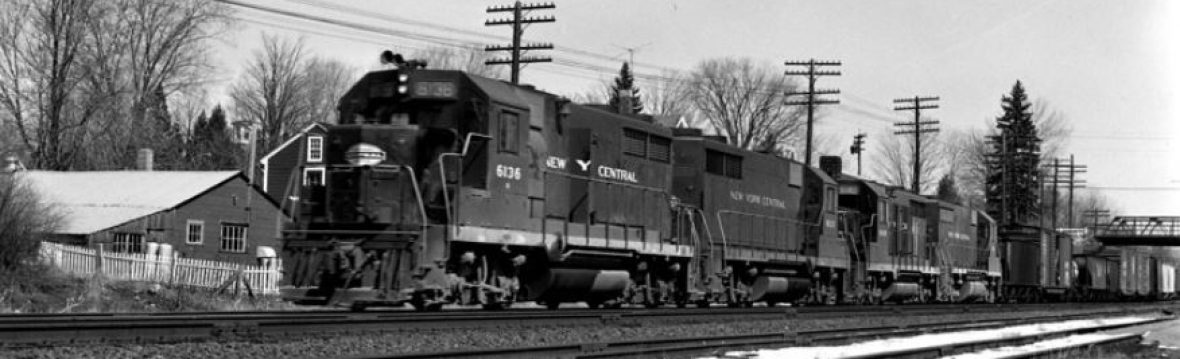
Boston to Selkirk Flexi-Van hotshot SV-3 accelerates west out of Worcester, MA behind four General Electric U-Boats led by #2555 on August 27, 1966. Crompton & Knowles’ loom works are to the left. Weedgrown sidetracks to traditional industries standing empty while intermodal traffic surged were a sign of the times. SV-3 was carded for a night-time departure from Boston for most of the 1960s, so daylight photos of this job are hard to come by.
Penn Central train 405 westbound at Jamesville, MA 7/27/69. Tom Murray photo, author’s collection.
One thing I do a couple times a week is to search E-Bay for 1960s Boston & Albany images. Often times I’ll just grab a screen shot of the picture, but if it something I think I may want for a future publication or this blog I’ll throw a bid in. Persistence pays off and a few times a year I’ll find something really useful. This is one of those finds and is a good example of how a below-average photo can be priceless to prototype research.
This is a picture of train #405, the westbound Boston to Albany run. This was a train that was heavily photographed due to its predictable daytime schedule. The photo is a little fuzzy and weather dreary; a magazine editor would throw it in the trash. The vantage point though is the James Street bridge – a place I’ve never found another photo taken from and it gives us a look at a whole bunch of details that are front and center on my layout. It is also the first period color photo I’ve found of the area.
Starting with color, we can confirm what the three-deckers to the upper left looked like. Some are still in the same shingles today. Further down is the Graham Street bridge. Black was the standard color of the overhead truss bridges on the B&A, but this one appears to be dull silver. Silver was certainly used on other bridges on the B&A and I have seen other trusses in this color during this period. This saves a mistake and will help set the layout in the 1960s. We also get a glimpse of G.F. Wright’s factory complex in the distance, while the brick colors were obvious, the photo confirms the gray color of the window panels. The different shades of gray on the ballast of the different tracks are even informative.
A close up reveals more details.
For details, we get a great look at the hardware that controls the switches including a pipe-connected hand throw crossover – standard engineering on the NYC for double track lines with Automatic Block Signals. Up on the hillside just before the bridge, it looks like the garage is filling in the land behind their building, implying that it was graded differently in 1965. Other details like the flanger sign, signals, and speed board are useful as well.
The lessons here are to really dig into you photo material and don’t stop looking for new material – you never know when you may come across an imperfect image that only you will appreciate.
New York Central RS32 #2023 at Collinwood, OH. George Elwood photo used with permission.
2022 was pretty much a dud for me on the model railroad front. I was doing well gearing up for the New England RPM meet through March, but from that point forward I got very little done. I did think that once September hit I was going to get back in gear, but the Fall came and went without me doing much of anything. Heading into Christmas vacation I had gotten exactly one freight car built in what is usually my most productive time of year. This past week has been a good time to hit the reset button and get going again.
First, I am finally on the other side of the mountain at work – my company had been acquired by a much larger firm and I had to pick up the slack in my department from those former co-workers who opted to take a buy-out. I finally was able to hire another person to help out and most of the integration-related workload is behind me, so I’m getting my energy back. Second, I have just about worked out a redesign of the area of the layout by the main entrance. The original plan called for the demolition of a small utility closet. It had turned into a mental block because I knew this was going to be a big lift for me to finish. The plan I now have in mind will be much easier to complete and essentially removes an obstacle. Third, we bought a new dining room set in September and with limited storage space, it went into the layout room until it could be disposed of. This created a horribly cluttered workspace that only served to help accumulate more stuff. Over the break we finally got Salvation Army to come to take it away.
With my layout room back, I started cleaning up. I first put away all of my rolling stock, which had done nothing but collect dust over the previous months. Getting them out of the way will let me get down and dirty on building the remaining benchwork. In the process, I recorded all the car numbers for an inventory. Then I opted to rebuild and reorganize my tool shelves underneath the layout along the back basement wall. These had come from a 6′ tall rack that came with the house. I cut it in half to fit under the layout. It was a nice idea but it didn’t work – they were a little too wide due to the supports and wouldn’t stay against the wall. So I took them apart, saved the shelves, and mounted them on new supports.
Neatness counts – the new tool storage area.
My wiring and track laying tools and supplies got separate new toolboxes, replacing a bunch of shoeboxes that had been used for decades. Other hardware and tools were organized and a trash bag full of junk was thrown out. Now everything fits nice and neat – behind the edge of the fascia. This project opened up the space I needed to complete the benchwork and lift-out section by the back door. I’m now engineering the completion of that project.
I also cleaned off a workspace to set up my slide scanner and digitize a dozen images to use as pre-programmed material over the next couple of months to keep this blog fresh. The first one is scheduled for Friday. So, a bunch of small steps added up to a pretty productive week and I have set myself up to move ahead in the New Year.
Jamesville Switcher March 1956, Jack Leonard Photo, Collection of Barb Hudson, used with permission.
Happy Labor Day folks. I’ve obviously taken an extended break from this blog. Long story short, a merger accompanied by an uncertain situation at work ate up my consciousness in the spring into the summer. Once that was finally settled, we were into the heart of the summer and I wasn’t into doing anything with models or research. Apart from attending the NERPM meet I’ve not done anything related to model railroading since March. I’m ready to start working again though, so regular posts will resume shortly.
One car that I’ve had on my most-wanted list for a long time was one of NYC’s 40′ boxcars with Despatch ends and roof from lot 858-B. This is a fairly simple kitbash from Branchline parts, resulting in a unique car.
Prototype
NYC’s Despatch Shops Inc. (DSI) built thousands of cars with their own ends and roofs between 1956 into Penn Central, but lot 858-B (numbered NYC 42000-43499) was the only lot of 40′ cars (N.B. – the last 100 cars had Improved Dreadnaught ends). Except for 25 experimental PS-1s, they were also the only 40’ers on the roster with 8′ doors. This feature made them the preferred car for assignment for appliance service. By 1966 about 2/3 of the fleet had been reassigned with new numbers. I discussed these car assignments and NYC’s appliance traffic flows in an earlier post.
NYC 87283 at Marshalltown, IA in 1966. This was assigned to Michigan Westinghouse. Oddly, it displays both Evans Spartan Loader and Evans Damage Free logos – these were competing load restraining systems. Unlike the prototype, I followed it also has correct load restraint symbols on the door. Sands photo, collection of George Elwood, used with permission.
Kitbash
After stripping a Branchline kit using 91% Isopropyl alcohol, I followed Seth Lakin’s excellent article in the NYCentral Modeler e-zine. Rather than double the hill and describe the work needed, I’ll just direct you here. I followed his directions pretty much exactly, although I replaced the .010″ x .020″ + .060″ x .020″ sill beam with one made of .030″ x .020″ + .040″ x .020″ to cut down on the bill of materials. Other changes were the use of Hi-Tech air hoses and Tangent uncoupling levers.
Paint & Decals
For paint, I wanted to model a car reassigned to appliance service. Some of these cars continued to wear their original red, most were painted different versions of Century Green. I wanted to model a green car, but the problem I had was the lack of a Transco SL decal. I did find a picture of a car assigned to Westinghouse in the NYC System Historical Society’s archive that only featured an NYC style SL decal similar to the one in the Microscale set so I followed that.
NYC 87175 was assigned to Whirlpool. Since it lacked Transco’s version of the SL mark, I was able to duplicate this scheme with Microscale’s decal set. Photo courtesy of New York Central System Historical Society’s archives, used with permission.
I painted the roof, ends, and body prior as subassemblies. The body was my formula of Vallejo Emerald and Blue-Green. This time I replaced some of the White with USAAF Aircraft Gray. Decals were from Microscale set 87-58. I supplemented this with CDS Set HO-165 for the “858-B”, “return to…Appliance Park, KY” and “BLT 8-56” lettering and Microscale 87-xx for the “Lift handle to open or slide door” and “adjust brakes here” lettering. This gave me a car with a Westinghouse number and a GE return to location, but I’m fine with just getting close, at least it says “appliance”! Smokebox Graphics provided the paint patch and repack/brake test stencils.
Weathering
I followed the picture, which appeared to be taken in the late 1960s for the weathering. I used raw umber oil paint for a wash and added some dark rust spots. Then I darkened the rivets with a dark umber colored pencil. After a coat of Vallejo Matte Varnish, I dusted on Pan Pastels – Burnt Sienna Extra Dark (couplers), Raw Umber (ends, trucks), Raw Umber tint (sides), and Medium Gray Extra Dark (roof and ends). The running board I used was a silver one stolen from an unweathered PS-1, I painted it black and then used a scratch brush to scrape off some paint to represent one with chipping paint. Lastly, I drew on chalk marks with a colored pencil.
With that, I had a car ready to haul appliances from the Midwest to Boston. This is another project with a good rendition of Century Green, I’m starting to feel comfortable that I’ve got this mix down enough to be brave enough to paint my Tangent cabooses. Not now though, I just have a couple more cars to clear the bench and I will start sawing wood again.
References
Seth Lakin, “Modeling a New York Central Lot 858-B Boxcar”, NYCentral Modeler, 4th Quarter, 2014 – Link
References: Ed Hawkins, “Freight Cars of the Fifties: NYC Despatch Shops Built 50 Foot Boxcars”, Railmodel Journal, February 1999
If life deals you lemons, why not go kill someone with the lemons (maybe by shoving them down his throat).
Deep Thoughts by Jack Handey
I purchased a pair of Branchline Trains 40′ boxcars kits at the Springfield Show a couple of years ago. They were labeled as having 8′ doors and I had a couple of projects in mind for them. When I got home I realized the box was mislabeled and they had less common 7′ doors. They were both correctly painted as Pennsylvania X43B cars, but I had one of those on my roster already, so I wanted to find something else to do with these.
A review of prototype AAR boxcars with 7′ doors was now in order to find suitable uses for these cars. I have merged the Ed Hawkins boxcar lists into a master spreadsheet of 40′ cars so this was a quick project. A summary of AAR style bodies with 7′ doors is as follows:
9,515 Postwar AAR – 10′ inside height [7,915 SP, 1,500 B&O (2/3 stretched to 50′ or retired by 10/66)]
500 Late Postwar AAR (1-3-4 “banana taper” ends, only Buffalo Creek)
250 Modified 1937 (5-5 ends, only CB&Q)
PRR X43B 86243 at Marshalltown, IA 1966 – Jim Sands photo, George Elwood collection, used with permission. This car was rebuilt with a fishbelly sill and repainted in the plain keystone scheme, other rebuilds featured a fishbelly sill.
As one can see, PRR and SP dominated AAR cars with 7′ doors – about 80% and this doesn’t include 1000 PRR X37 cars! I would have loved to have done one of the SP cars, but the 10′ height is not a match for the Branchline body, so those got thrown out. So one should be PRR, perhaps kitbashing another X43B rebuilt by the PRR with one of their distinctive sills or one of the X29Bs. For the other car, I wanted to choose one of the 2635 “other” Postwar AAR cars.
The below roster shows there isn’t a clear-cut winner here with many roads having 250-750 car fleets. Cars are listed from largest to smallest fleets:
RR
Numbers
Qty.
Year
Door
Panels
Construction
GTW
515500-515999
500
1949
Superior – 7 panel
12
Welded
GTW
516000-516599
250
1953
Youngstown
10
Riveted
LV
63000-63524
525
1950
Youngstown
10
Riveted
ERIE (EL)
84501-84511
10
1952
Youngstown
10
Riveted
ERIE (EL)
86000-86499
500
1952
Youngstown
10
Riveted
CNJ
20500-20999
500
1953
YSD/Sup-5 panel
12
Welded
C&S
1250-1499
250
1951
Superior
10
Riveted
AA
1000-1099
50
1951
Youngstown
12
Welded
WM
4001-4050
50
1951
Youngstown
10
Riveted
Postwar AAR boxcars with 7′ doors and 1-3-4 early improved dreadnaught ends, excluding PRR X43 classes.
A possible candidate was this GT&W class, seen at Lowell, MA on the B&M in July 1965. At the time I was picking a prototype, “wet noodle” decals for a 40’er looked hard to find. Leroy Dozier photo, George Elwood collection, used with permission.
Several of the riveted cars were produced by Branchline and can still be found with some work, it seemed pointless to go through the work of stripping, painting, and decaling a car I could probably find on eBay. So, after a little bit of research, I settled on the CNJ 20500-20999 series for something different. I had no CNJ boxcars on my roster, these were representative of their fleet as a whole, giving me a chance to model a welded car not otherwise available.
CNJ 20672 at Marshalltown, IA in 1967, the car features the large Stature of Liberty emblem. The first 300 cars had 5-panel Superior doors like this example and the last 200 had Youngstown. Jim Sands photo, collection of George Elwood, used with permission.
Construction was pretty much a standard kit build beyond sanding off the rivets. The equipment diagram online at Fallen Flags helped me select some details. I substituted the following parts for the kit parts:
Trucks – Kato ASF Ride Control
Couplers – Kadee #158 in their scale boxes
Brake Rods – .125″ Tichy phosphor bronze wire and Tichy turnbuckles for clevises
Air Hoses – Hi-Tech
Uncoupling Levers – Tangent, with Details Associates eye bolts
Door – Kadee 5-panel Superior with high tack boards
Brakewheel – Kadee Miner
Brake Platform – Plano Apex
Running Board – Kadee Apex
When the construction was done I drew the locations for the panel lines on with pencil and coated the car with Future. I then applied thin Archer Raised Panel Line decals followed by another coat of Future. I followed with a coat of Vallejo Gray Surface Primer.
Primer showed off a few blemishes but made the Archer panel seams look worth the effort.
Photos of these cars showed a wide range of paint colors from reddish oxide to chocolate brown. If any railroad would use whatever paint was on sale at the hardware store for its car shop, it was the near-bankrupt CNJ. I wound up settling for a color in the middle of the range and painted the car Model Master Oxide Red Flat and trucks, and underframe Model Master Grimy Black Flat. I applied CMR Products decal set 1367 with the large Statue of Liberty logo. Smokebox Graphics supplied repack, and reweigh stencils and corresponding paint out blanks.
A pair of clean CNJ boxcars demonstrate how body color varied. Screen shot detail from “Along the Jersey Central – 5” on YouTube. Compare these with the much redder 20672 above.
This is the first time I’ve used either decal vendor. The ink on the CMR decals is kind of thick but settled down over the panel lines nicely. The graphics were based on the Jim Sands photo I was using, still I had to borrow some decals from Microscale to finish it. The CNJ put the wheel and draft gear/coupler data that is normally found on the car ends underneath the data on the side. So I added that and some other stuff, see the photo below.
Detail of CNJ 20582. It was reweighed and repacked (and probably repainted) at CNJ’s Ashley, PA shop n August 1966. Jim Sands photo, Marshalltown, IA 1967, George Elwood collection, used with permission.
The Smokebox Graphics decals are extremely thin, so be careful. The sets combine to be very flexible though, I was able to duplicate all stencilings, except for the repack, exactly. It had weight data that matched. There are 78 pairs of data – in each of roman and gothic there are 16 pairs of 50-ton cars, 16 for 70-ton cars, and 7 for 100-ton cars. With that are 63 pairs of reweigh stations, with dates, repack, and test stencils (the last for the air reservoir or adjacent sill) and 23 lubricator stencils. It also includes extra dates, numbers and alphabets to let you make whatever you want. All the lettering is crystal clear. The paint patches come in five colors per sheet and match up with the outlines of the data. I figure I can squeeze about 50 1961-65 stencils out of this set except for the tiny dates on the repack stencils.
As I thought about how to weather the car, I decided to pay special attention to the roof. It was hard to say, but it appeared that the cars were delivered with painted roofs and had most of the paint flake off by the 1960s. Following a random prototype photo of a boxcar with 90% paint failure, I applied Vallejo Liquid Mask with a toothpick. I then gave the roof a brush coat of medium gray (Poly Scale BAR Gray) and then stippled on a light gray (PS Undercoat Light Gray) with a stiff bristle brush. After a flat coat, I applied Payne’s Gray Pan Pastels to highlight the edges. The Vallejo mask has a reputation of being hard to get off, I removed it by rubbing the roof with a ball of masking tape with the sticky side out and then rubbing the edges of the stampings with a toothpick. I had to make several balls but it got almost all of it off. The thicker you apply the mask, the better chance you have of finding it after and getting it off. I then painted the roof ribs with the body color using a spotter brush. This technique was a first for me and it came out exactly the way I wanted.
I used this Marty Bernard photo from July 1965 in Chicago as a guide for the roof.The final results.
I weathered the rest of the car first with a wash of raw umber oil paint followed by a final coat of Vallejo Polyurethane Matte Varnish and a dusting of Pan Pastels wrapped up the first car of this series. So an accidental purchase caused me to learn how to use Archer panel lines, liquid masking, a couple new decal vendors and create an interesting car that I would have never done otherwise, that is how you make the best of a mistake. As for the second car, while I was considering a PRR X29b build I fell into a spare Red Caboose X29 underframe, which sealed the deal as it will greatly simplify the project. I’ve already fit the underframe onto the car, it should be another fun project.
P&LE 6350 at Framingham, MA circa 1965. Note that the car has a US Gypsum or Morton running board (cars through at least 6288 used Apex) and the roof is painted Century Green, not bare galvanized steel. Leroy Dozier photo, George Elwood collection (used with permission).
In the 1960s railroads and carbuilders started to transition boxcars to an exterior post construction (X-Post). Southern (SOU/CG) and Hill Lines (NP-GN-CB&Q) were early adopters with fleets by 1963. Not to be outdone, NYC had the Despatch Shops build a prototype X-Post car, NYC 100000 in 1964. Lot 939-B was a one-off car, it featured 9 panels on each side of a 10′ Youngstown sliding door. The railroad apparently deemed this test a success and immediately began full-scale production in late 1964. These cars have been referred to by some as “X58 Clones”, but they were built concurrently with the PRR X58 and the prototype Lot 939 car predated the X58.
NYC prototype X-post box, 100000 as seen in the September 1964 issue of the Central Headlight. Note the 70-ton plain bearing A3 trucks. (NYC Historical Society Collection, used with permission).
The first cars constructed in regular production were P&LE 6000-6449, Lot 955-B. These cars had 8-panel sides, 10′ Youngstown doors, DSI roofs, and ends, and Keystone cushion underframes. This was followed by Lot 974-B in January 1966 (P&LE 6500-6899) which was almost identical and Lot 975-B in March 1966 (P&LE 6900-6999) which were built without running boards and were insulated with 10′ 6″ plug doors. DSI continued to build X-Post cars through 1970 for NYC, PC, and LV.
Lot 974-B at DeWitt Yard, East Syracuse, NY. Jim Parker photo, collection of George Elwood, used with permission.A lot 975-B on the NYC-New Haven interchange track at Framingham, MA in 1966. Note the low haning trainline. Leroy Dozier photo, George Elwood collection, used with permission.
Construction
Building one of these cars in HO scale requires you to do it as the prototype did – by sourcing all the components from different manufacturers and putting them together in your shop. The basic combination is made up of sides from a Soo Line Historical Society boxcar (produced by Accurail), Accurail 10′ Youngstown door, DSI roof and ends from Branchline (Atlas), and a Details West cushion underframe. The sides aren’t an exact match, but it sure beats scratch building.
I’m hardly the first to attempt this build so I’ll just provide a bill of materials and post-construction photos rather than get into a long discussion about construction. One thing I should mention is that I didn’t realize until it was too late that you need to lengthen the wheelbase on the Details West underframe to 40′ 10″. As a result, my wheelbase is about a scale foot too short. That wasn’t a huge mistake and I’m not about to tear the thing apart to fix it, but it is apparent when compared to a prototype photo.
Bill of Materials
Sides: Soo Line Historical & Technical Society undecorated 7-post boxcar kit
Door: Accurail #110 10′ Youngstown
Ends & Details/Roof: Branchline Trains (Atlas) [may have to source from new old stock NYC 50′ kit]
Underframe: Details West #182 or #183 – I replaced the middle section – there are better options for this part today – a Tangent X58 Keystone underframe might be the best (95010-06).
Running Board – Plano (Apex) or (US Gypsum) with Tichy corner grabs (or Kadee)
Crossover platform – Plano #128
Brake step – Plano #130
Brake wheel – Kadee #2025/2035/2045
Ladders – Detail Associates #6242
Uncoupling Lever – Plano #1202
Air Hoses – Hi Tech
Ladder Rungs – Tichy #3062
Sill Steps – A-Line Type B #29001
I didn’t do much detail on the underframe – I had no plans and you can’t see much when the car is on the track. I removed the Hydra-Cushion device leaving a blank panel. I did include what looked like a train line hanging from supports by using .020″ wire strung through long eye-bolts.
Painting
I primed the car with Vallejo Gray Surface Primer and then painted the car with a mix of Vallejo Model Color Blue Green, Emerald, and White. Model as described in my prior post here. I managed to successfully restore an old set of Microscale decals for this car, by using a couple of coats of their liquid decal film. A few decals from other sources were needed to fill in some of the blanks. I couldn’t find the end lettering in the correct font and ultimately decided the font was more important to me than the words.
Besides making a huge mistake and lettering “P&LE” in the wrong panels and then having to repaint half the car, the biggest issue I had was the cigar band. I thought a standard 48″ band would work, but it seems the NYC had a special stencil instead of a normal Scotchcal to do these over the ribs. The ‘T’ in Central sat right on the rib, but none of the red “NEW YORK; SYS – TEM” letters did. To do this right I deconstructed three cigar bands, scraped the red lettering off of the white background, layered them, and then carefully painted the gap in between where they didn’t quite meet. Solvaset was necessary to get the T to wrap around.
Detail of Cigar Band
My deconstructed cigar band. The oval is from two Microscale locomotive sets, one for CEN, RAL and one for the T; the red lettering is from the Microscale boxcar set (it is a little smaller).
Finished decal – it looks OK as long as you don’t do an extreme close-up like this!
As a less than a year-old car, I only gave it a coat of Vallejo Matte Varnish and a light dusting with Pan Pastels to finish it. This time I used a 2:1 ratio of varnish to thinner and it came out much flatter than my previous attempts.
Summary
The total US fleet of 50′ X-post boxcars was just over 8,000 50′ cars during my modeling period, led by PRR’s X58 (a partial roster of 50′ cars can be found after this paragraph, there were also 40′, 60′, and 86′ cars, plus 50′ reefers and other RBLs not part of this discussion). With the math I’m using to build my roster, this model plus my Tangent X58 should do it, but I will probably add one of the Cannon & Co. GN or NP offerings to the mix as well. Exterior post cars certainly stood out in consists of the day, so it is a good idea not to do too many even if they are a sign of the times. I have to say, this was a fun car to put together and will help contribute to a mid-1960s feel to my layout.
Let’s close with a gallery of other major types of exterior post 50′ boxcars in service through the end of 1965. The first group are from the George Elwood collection, used with permission (LV, CofG Jim Sands Marshalltown, Iowa 1967-69; PRR, NP, GN, CB&Q Leroy Dozier around Mass. c. 1965; SOU PS Builders photos are from the James Kinkaid Collection of Pullman Library used under creative commons license:


